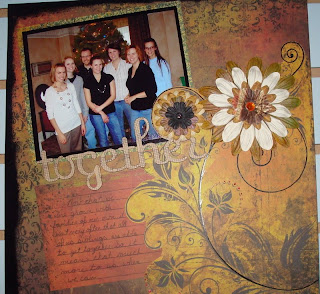
This is my favorite wedding photo of my parents and when I saw this new line of paper I knew exactly which photo to use with it. This layout is made from the Love Letters line by My Little Yellow Bicycle. I really like this paper and already have another layout in mind.

I started with the
decorative edge ledger paper as my base. Then I used the red side of the
kiss with border paper, cut it into an 8x8 square and attached it. I also used the
grey damask paper, cut it 3x10 and attached it just inside the right side of the decorative border paper.
After that I used the Sweet Mix blackboard letters from Cosmo Cricket for my title. You can attach these letters using a wet adhesive, but I used the Tape-N-Roller from Kokuyo. It has a really strong hold and doesn't ripple the paper. It has become my personal favorite adhesive. (A great thing about blackboard letters is you don't have the chipboard edge showing on the side of the letters. It's black all the way through.)

Next I used one of the
clear cuts frames & titles to overlay on my photo. It works best if you attach the photo to the paper first and also any other items you want it to overlap. I went ahead and positioned my
sheer calender made by
Maya Road and attached it using a glue dot (
Slick Writers work great for writing on these). When attaching an transparency you can use different techniques. Here I used small
Zots glue dots and placed them under the black border in a few spots.

After that I attached a
Prima lace ribbon to the bottom of the transparency using F
astenater staples. I could staple all the way through the transparency and paper to attach it if I wanted to, but the Z
ots have a strong enough hold.
Yes, I attached the lace ribbon after the transparency was attached. The Zots holding the transparency were posititioned a little higher and I could slide a stapler under the edge. That way I could line up exactly where the ribbon should go.

If you would like to make these easy ribbon flowers, start with a 6 inch piece of ribbon.

Stitch along one edge, all the way to the end.

Pull the thread until you have a ruffled half moon shape.

Place the two ends together and sew from the back side. After you have tied your knot your ribbon should look like a flower.

The Z
ots glue dots work great for attaching these flowers.

To create the swirl border down the left side of the paper I used
Black Magic Core'dinations cardstock, cut the image on my
Cricut, ran them through a C
uttlebug embossing folder in the
Sizzix BigShot machine
.
Then I used a sanding block across the top to show the red center.

The
Cricut cut out I chose had circles cut in the pattern. I used Christmas Red
Stickles to fill them in.

Here is the finished page.

These are the papers we carry from the
Love Letters line.
The decorative edge ledger, grey damask/x's & o's, and kiss with border/grid.
I also spread out the rest of the pack from the clear cuts frames and titles.


 Shirley W.
 Trudy M.
  Heather C.
 Julie S.
 Cheryl L.
 Nicole M.
 LaDonna M.
 Jennifer E.
 Autumn C.
 Shannon P.
 Gina G.
 Lori W.


 Melanie H.
  Barb W.
  Martha R.
  Candy N.
  Angie S.
  Lori W.


 For the letter


